pear upgrade –force http://pear.php.net/get/Archive_Tar http://pear.php.net/get/XML_Parser http://pear.php.net/get/Console_Getopt-1.2.2
pear upgrade –force http://pear.php.net/get/PEAR-1.3.3 (_IF_ your existing version is older than 1.3.3)
pear upgrade –force http://pear.php.net/get/PEAR-1.4.3.tar
pear upgrade PEAR
Archive for the ‘Windows’ Category
pear upgrad new version
Posted by sasikumarp on July 22, 2008
Posted in Windows | Leave a Comment »
How to Manually Remove Viruses From Your System
Posted by sasikumarp on March 19, 2008
Note: This solution will work only against those Viruses which does not infect Windows own Exe files e.g like explorer.exe
Virus Symptoms
You may have seen some unexpected things that should not happen. Some of the symptoms of viruses are:
Disables Task Manager
Disables Registry Editor
Disables Command Prompt
Sometime you have no application open but CPU usage goes over 50%
My Computer Drives not opening by Double Click
Automatic Shutdown
Computer Slows down
Hidden Files will not be showing
Folder Options will be disappear
Manual Removal
If you have tried all the solutions listed on our site and still could not disinfect your system then try to manually remove the virus using the instructions below:
In order to compelete the instructions below. You need to have Process Explorer and Autoruns. Download them separately
http://download.sysinternals.com/Files/ProcessExplorer.zip
http://download.sysinternals.com/Files/Autoruns.zip
Unpack these and copy exe files to Windows Directory
Close and exit all programs (even from tray) except Internet Explorer or your internet browser
Run process explorer by typing procexp in the start menu Run and do as illustrated.
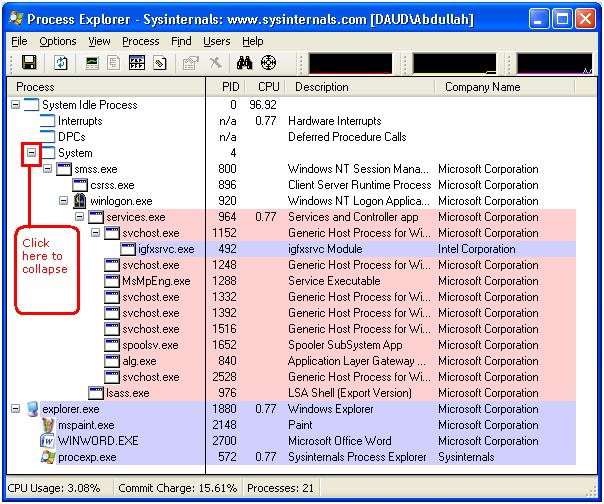
After collapsing

procexp.exe is Process Explorer’s own process
winword.exe is MS WORD
mspaint.exe is Paint
IEXPLORE.exe is Internet Explorer
Wmplayer.exe is Windows Media Player
If you do see any suspicious process
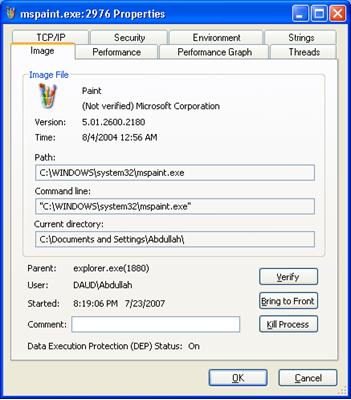
then right click on it and then properties. In the path: field copy the path and Open Run Dialogue and paste the path there
Now terminate the suspicious task in process explorer
If the same process starts again then suspend the process by right clicking on it and click suspend on the menu. Remove the name of the application from path now listing only folder.
e.g If you have copied C:\WINDOWS\system32\mspaint.exe then remove mspaint.exe and you will see C:\WINDOWS\system32\ this in the Run Dialogue.
Delete Hidden Files
Press Enter to open Explorer and locate the file name whose name you have just removed.After locating the file delete the file.If you can not find the file it must be hidden.
If Show Hidden Files and Folders Option not working Use WinRAR
To remove hidden files Download WinRAR which will show you all hidden files
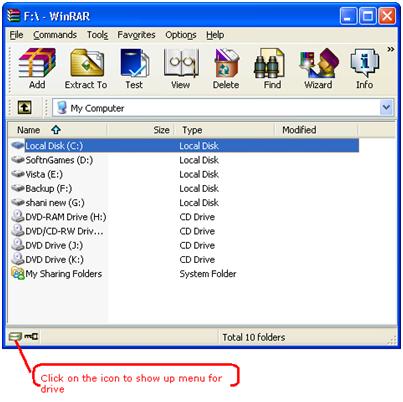
See the figure and locate that file and delete that file. If still unable to delete file then see our post about deleting the file.
Now look at the root of every drive to find hidden files.
Delete .exe and autorun.inf like files if you find any. But do not delete these files as these are system files
autoexec.bat, boot.ini, bootmgr,config.sys, io.sys, msdos.sys, ntdetect.com, pagefile.sys,ntldr, hiberfil.sys
Now you have successfully terminated virus process the next thing is to remove those virus files which start upon system start.
Open Autoruns by typing autoruns in the Run Dialogue. Wait while refreshing completes.
In the Options –> Hide Microsoft Entries. And click Refresh button on the interface OR Close the program and start again

After scanning completes select Logon tab and uncheck all the entries be sure do not unselect any Microsoft Entry.Restart system for the changes to take effect.
Now use Ravmon Virus Killer to restore some settings
Now scanning your system for an Anti-Virus will be the last suggestion
Troubleshooting
Incase of any problem. you did a wrong move. Open Autoruns, in the Options –> Unselect Hide Microsoft Entries. And click Refresh button on the interface OR and select all entries .Close the program and start your system again.
Enable Run Command if it is missing from Start Menu December 8, 2007
Posted by raghupathy in Windows.
add a comment
Some User have complained about the Run Command missing from Start Menu due to some virus effects. Also users when press ( Windows Key + R ) to use Run command an error message appears
This operation has been cancelled due to restrictions in effect on this computer. Please contact your system administrator.

Run not displaying in Start Menu
So I have finally came up with the solution for it. I have made up two solutions, Manual and Automatic. First try Manual and if it did not work then try Automatic.
Manual Solution
Open My Computer –> C drive –> Windows –> System32 –> Locate gpedit.msc file and run it. See the figure below

While you have opened Group Policy see in the left pane and in the User Configuration Expand Administrative Templates and select Start Menu and Taskbar now in the right pane locate Remove Run Menu from Start Menu and double click it. See the figures


Select Disabled in the properties dialogue and press apply then OK
Now close all open Windows you will see the Run has been restored in Start Menu. See the figure now

Automatic Solution
Download Ravmon Virus Removal Tool and then use Restore Default Windows Settings to Restore.
After this either Restart or kill explorer.exe or run it again
Posted in Windows | 1 Comment »
check dsl speed test and
Posted by sasikumarp on February 28, 2008
Below links are useful to check speed test in dsl connection
http://www.dslreports.com/speedtest?flash=1
Posted in Linux, Uncategorized, Windows | Leave a Comment »
set passwod in Apache using htaccess
Posted by sasikumarp on February 23, 2008
Implement User/Password-protected Directories
DeveloperSide.NET Articles
Important Notes
- Make sure that directory C:\www\Apache2\bin is specified under the System Path variable (if you installed our Web-Server Suite package, this is set). We will use a program named htpasswd.exe, that is contained under the mentioned directory, to create a password file for the specified users.
Create the protected Directory
This section will show you how to create directory “private” outside the Web-Server’s webroot directory “C:\www\webroot” using the command prompt.
Open the Windows command-shell via Start » Run… cmd.exe <click ok>
Change to the drive letter of your Web-Server Suite’s root directory (this is the drive you installed the Web-Server Suite under; for this example we will use drive “C:”)…
...> C:Change to the path of your Web-Server Suite’s root directory (for this example we will use path “\www”)…
C:\...> cd \wwwCreate the directory you want to restrict access to with a user/password prompt (we will create directory named “private”)…
C:\www> mkdir privateChange to your newly created directory…
C:\www> cd private
Create user/password file
Continuing from the previous section, we are now ready to use htpasswd.exe to create a file named “.htpasswd”: this file will contain user names with their respective passwords (the passwords will be encrypted before placed under the file).
This 1st line (with switch “-c” — that will not be repeated in the following lines) will create a file named .htpasswd under the current directory (C:\www\private). The password given will be encrypted by the htpasswd.exe program (due to the “-m” switch — MD5 encryption).
User named “user1” with password “passuser1” is specified 1st…
C:\www\private> htpasswd -cmb .htpasswd user1 passuser1Add user named “user2” with password “passuser2” to the .htpasswd file…
C:\www\private> htpasswd -mb .htpasswd user2 passuser2Add user named “user3” with password “passuser3” to the .htpasswd file…
C:\www\private> htpasswd -mb .htpasswd user3 passuser3
Configuration — httpd.conf
We can now edit Apache’s httpd.conf file to bring everything together.
Edit file C:\www\Apache2\conf\httpd.conf
Make sure that the following two ‘LoadModule’ lines are uncommented, by removing the beginning “#” character…
(These ‘LoadModule’ lines should already be uncommented, by default)
LoadModule access_module modules/mod_access.so
LoadModule alias_module modules/mod_alias.so Uncomment the following two ‘LoadModule’ lines, by removing the beginning “#” character…
(The 1st line is required for directive ‘AuthUserFile’)
(The 2nd line is required for directive ‘Options Indexes’: to display the index of a directory)
LoadModule auth_module modules/mod_auth.so
LoadModule autoindex_module modules/mod_autoindex.so Insert code…
<Files ~ "^\.ht">
   Order allow,deny
   Deny from all
</Files>

Alias /private "/www/private"

<Directory "/www/private">
   Order allow,deny
   Allow from all

   Options Indexes
   AuthType Basic
   AuthName "Private Access"
   AuthUserFile "/www/private/.htpasswd"
   Require valid-user
</Directory>
Save file and Restart Apache…
(from the command prompt type the following)
> net stop Apache2
> net start Apache2
Test protected Directory
Access http://localhost/private/
Enter one of the user/password combinations…
You should now see either the directory structure, or (if you have an index.html\php file under the accessed directory) your index file.
To [truly] logout as the user, you must close the browser window.
Advanced Configurations and Features
You can also grant/restrict access to the user/password protected directory with IP addresses…
Replace the original “<Directory “/www/private”>” block with this updated version…
(or simply replace the first two lines of the original block)
<Directory "/www/private">
   Order deny,allow
   Deny from All

   Options Indexes
   AuthType Basic
   AuthName "Private Access"
   AuthUserFile "/www/private/.htpasswd"
   Require valid-user
</Directory>
Below the line…
Require valid-user
..add the following code…
Allow from 127.0.0.1
Satisfy Any
…if you access the protected area from your local system (IP address — 127.0.0.1), there will be no need to enter a user/password combination.
(Note that you can add multiple “Allow from ip-address” statements to grant access)
…by using the following code instead…
Allow from 127.0.0.1
Satisfy All
Posted in Windows | 1 Comment »
Show Hidden Files and Folders not working?
Posted by sasikumarp on February 22, 2008
Go to registry editor by running regedit in the run box.
Go to this key:
HKEY_CURRENT_USER\Software\Microsoft\
Windows\CurrentVersion\Explorer\Advanced
In the right hand area, double click hidden and change the value to 1.
Posted in Windows | 1 Comment »
Vmware Converter can convert the windows machine as vmware image
Posted by sasikumarp on February 21, 2008
VMware Converter provides an easy-to-use, scalable solution for migrations of machines, both physical to virtual and virtual to virtual. Optimized for mass migration, VMware Converter is equally effective for single-machine conversions. With its comprehensive and comprehensible wizards and task manager, VMware Converter imports virtual machines faster, with fewer manual steps required, and fewer source hardware limitations than other methods. With its ability to perform hot cloning, VMware Converter can import a virtual machine with no downtime on the source physical machine.
- Conversion of VMware hardware version 6 products: Workstation 6.x, VMware ACE 2.x, VMware Fusion 1.x, and VMware Player 2.x
- Conversion of an additional third-party disk image format: Acronis True Image 9
- Experimental support for Microsoft Vista 32-bit and 64-bit operating systems
- Ability to set speed and duplex settings on the network adapter while performing cold cloning migrations, by using the VMware Converter Enterprise Boot CD
- Support for Symantec Backup Exec System Recovery 7.0
You can download the vmware converter by using the following link
Posted in Uncategorized, Windows | Leave a Comment »
Unable to Open Hard or USB Flash Drive with Windows Script Host Cannot Find Script File autorun.vbs Error
Posted by sasikumarp on February 21, 2008
n some situation especially when anti-virus program has cleaned, healed, disinfected or removed a worm, trojan horse or virus from computer, there may be error happening whenever users try to open or access the drive by double clicking on the disk drive icon in Explorer or My Computer window to try to enter the drive’s folder. The problem or symptom happens in hard disk drive, portable hard disk drive or USB flash drive, and Windows will prompt a dialog box with the following message:
Windows Script Host
Can not find script file autorun.vbs.
Sometimes you will be asked to debug the VBScript with error code of 800A041F – Unexpected ‘Next’.
or
Choose the program you want to use to open this file with:
In this case, the “Always use the selected program to open this kind of file” option is grayed out.
The symptom occurs because when autorun.vbs is created by trojan horse or virus. The virus normally loads autorun.inf file to root folder of all hard drive or USB drive, and then execute autorun.bat file which contains script to apply and merge autorun.reg into the registry, with possible change to the following registry key to ensure that virus is loaded when system starts:
[HKEY_LOCAL_MACHINE\SOFTWARE\Microsoft\Windows NT\CurrentVersion\Winlogon]
Userinit=userinit.exe,autorun.exe
Finally, autorun.bat will call wscript.exe to run autorun.vbs.
When antivirus or security software detected the autorun.vbs file as infected, the file will be deleted or removed or quarantined. However, other files (autorun.*) and registry value still referring to autorun.vbs, and this document no longer exists, hence the error when users double click to open a drive folder.
To correct and solve this error, follow this steps:
- Run Task Manager (Ctrl-Alt-Del or right click on Taskbar)
- Stop wscript.exe process if available by highlighting the process name and clicking End Process.
- Then terminate explorer.exe process.
- In Task Manager, click on File -> New Task (Run…).
- Type “cmd” (without quotes) into the Open text box and click OK.
- Type the following command one by one followed by hitting Enter key:del c:\autorun.* /f /s /q /a
del d:\autorun.* /f /s /q /a
del e:\autorun.* /f /s /q /ac, d, e each represents drive letters on Windows system. If there are more drives or partitions available, continue to command by altering to other drive letter. Note that you must also clean the autorun files from USB flash drive or portable hard disk as the external drive may also be infected. - In Task Manager, click on File -> New Task (Run…).
- Type “regedit” (without quotes) into the Open text box and click OK.
- Navigate to the following registry key:HKEY_LOCAL_MACHINE\SOFTWARE\Microsoft\Windows NT\CurrentVersion\Winlogon
- Check if the value name and value data for the key is correct (the value data of userint.exe include the path which may be different than C drive, which is also valid, note also the comma which is also needed):“Userinit”=”C:\WINDOWS\system32\userinit.exe,”If the value is incorrent, modify it to the valid value data.
Posted in Windows | Leave a Comment »
Removing the ntde1ect.com and autorun.inf files
Posted by sasikumarp on February 21, 2008
There is a trojan/virus (either the Win32/Pacex virus or the Win32/PSW.Agent.NDP trojan) that uses those two files. Here is how you can get rid of them:1) Open up Task Manager (Ctrl-Alt-Del)
2) If
3) If
4) Open up “File | New Task (Run)” in the Task manager
5) Run
6) Run the following command on all your drives by replacing c:\ with other drives in turn (note: if you have autorun.inf files that you think you need to backup, do so now):
2) If
wscript.exe is running, end it.3) If
explorer.exe is running, end it.4) Open up “File | New Task (Run)” in the Task manager
5) Run
cmd6) Run the following command on all your drives by replacing c:\ with other drives in turn (note: if you have autorun.inf files that you think you need to backup, do so now):
del c:\autorun.* /f /a /s /q
7) Go to your Windows\System32 directory by typing cd c:\windows\system32
![]() Type
Type dir /a avp*.*
9) If you see any files names avp0.dll or avpo.exe or avp0.exe, use the following commands to delete each of them:
attrib -r -s -h avpo.exe
del avpo.exe
10) Use the Task Manager’s Run command to fire up regedit
11) Navigate to HKEY_CURRENT_USER \ SOFTWARE \ Microsoft \ Windows \ CurrentVersion \ Run (as usual, take a backup of your registry before touching it!)
12) If there are any entries for avpo.exe, delete them.
13) Do a complete search of your registry for ntde1ect.com and delete any entries you find.
14) Restart your computer.
Posted in Windows | Leave a Comment »
double click pen or thumb drive not opening
Posted by sasikumarp on February 21, 2008
Recently, I had been facing this problem on all the virus hit systems on one of my client’s network. The problem was that I was getting the “Open With” dialog every time I double clicked any drive in My Computer. I had to select Internet Explorer from Open With dialog to open the drives. One of my friends came up with an idea and it worked great. The idea was to create a blank autorun.inf file in the drive having problems. And it was perfect .. now I can open all my drives (after placing the blank autorun.inf in the drive) by double clicking them.To make a blank autorun.inf, open notepad and Save As “autorun.inf”. Place the autorun.inf in the affected drive.
Having the same problem? Did this trick solve your problem or you had a better solution? Share your experiences.
UPDATE: Please use the following DOS command for the ease of deleting the autorun.inf file.
C:\>attrib -S -H -R C:\autorun.inf
C:\>del /F C:\autorun.inf
Replace C with your drive that you want to disable autorun of.
Posted in Windows | Leave a Comment »
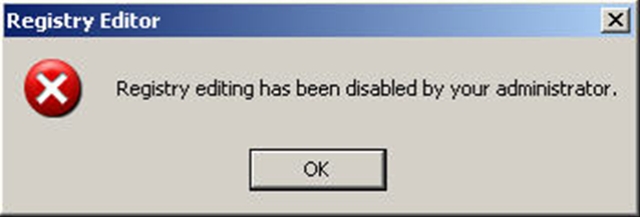
Registry Editing Has Been Disabled By Your Administrator
Posted by sasikumarp on February 21, 2008
Today a friend of mine asked that his registry editor had been disabled accidently and now how should he enable it back again. Here are two ways to enable the registry editing in Windows. 1- From Group Policy Editor
 1- From Group Policy Editor
Go to Run –> gpedit.msc
In the left hand menu, go to User Config –> Administrative Templated –> System.
Now In the right hand pane, select “Prevent access to registry editing tools”. It will probably be not configured or enabled. If it’s enabled, disable it and if it’s not configured, first enable it, apply settings and then disable it. Most probably the settings have been applied instantly. If not, then run gpupdate in command prompt to apply the group policies.

2- From the Run Menu
I got this tweak while surfing the internet. Go to Start –> Run, copy and paste the follow in the Run box and press OK.
REG add HKCU\Software\Microsoft\Windows\CurrentVersion\Policies\System /v DisableRegistryTools /t REG_DWORD /d 0 /f
The effects are usually instant. If not then you should see the results after restarting your computer.
Please tell us your experiences on this tweak.
Task Manager has been disabled by your administrator December 8, 2007
Posted by raghupathy in Windows.
add a comment
whenever try to open the task manager, getting the following error: “Task Manager has been disabled by your administrator”
 “Task Manager has been disabled by your administrator”
Here is solution from the Microsoft article about enabling the task manager:
Enabling Task Manager from Group Policy Editor
1. Go to “Start” -> “Run” -> Write “Gpedit.msc” and press on “Enter” button.
2. Navigate to “User Configuration” -> “Administrative Templates” -> “System” -> “Ctrl+Alt+Del Options”
3. In the right side of the screen verity that “Remove Task Manager”” option set to “Disable” or “Not Configured”.
4. Close “Gpedit.msc” MMC.
5. Go to “Start” -> “Run” -> Write “gpupdate /force” and press on “Enter” button.
Enabling Task Manager from Registry Editor
1. Go to “Start” -> “Run” -> Write “regedit” and press on “Enter” button.
Warning: Modifying your registry can cause serious problems that may require you to reinstall your operating system.
Always backup your files before doing this registry hack.
2. Navigate to the following registry keys and verity that following settings set to default:
Windows Registry Editor Version 5.00
[HKEY_CURRENT_USER\Software\Microsoft\Windows\CurrentVersion\Policies\System]
“DisableTaskMgr”=dword:00000000
[HKEY_CURRENT_USER\Software\Microsoft\Windows\CurrentVersion\Group Policy Objects\LocalUser\Software\Microsoft\Windows\CurrentVersion\Policies\System]
“DisableTaskMgr”=dword:00000000
[HKEY_LOCAL_MACHINE\SOFTWARE\Microsoft\Windows\CurrentVersion\policies\system\]
“DisableTaskMgr”=dword:00000000
[HKEY_LOCAL_MACHINE\SOFTWARE\Microsoft\Windows NT\CurrentVersion\Winlogon]
“DisableCAD”=dword:00000000
3. Reboot the computer.
For your convenience, I have created a registry file. Just download, double click it and add the info to your registry. The task manager will be enabled. Post your experiences please.
Download the registry file here.
Enabling Task Manager from the Run Menu
Abdullah mailed me this solution. Go to Start –> Run and copy and paste the following and press OK.
REG add HKCU\Software\Microsoft\Windows\CurrentVersion\Policies\System /v DisableTaskMgr /t REG_DWORD /d 0 /f
Posted in Windows | 2 Comments »
