Sasikumarp’s Weblog

Archive for March, 2008

How to Manually Remove Viruses From Your System

Posted by sasikumarp on March 19, 2008

Note: This solution will work only against those Viruses which does not infect Windows own Exe files e.g like explorer.exe

Virus Symptoms

You may have seen some unexpected things that should not happen. Some of the symptoms of viruses are:

Disables Task Manager

Disables Registry Editor

Disables Command Prompt

Sometime you have no application open but CPU usage goes over 50%

My Computer Drives not opening by Double Click

Automatic Shutdown

Computer Slows down

Hidden Files will not be showing

Folder Options will be disappear 

Manual Removal

If you have tried all the solutions listed on our site and still could not disinfect your system then try to manually remove the virus using the instructions below:

In order to compelete the instructions below. You need to have Process Explorer and Autoruns. Download them separately

http://download.sysinternals.com/Files/ProcessExplorer.zip

http://download.sysinternals.com/Files/Autoruns.zip

Unpack these and copy exe files to Windows Directory

Close and exit all programs (even from tray) except Internet Explorer or your internet browser
Run process explorer by typing procexp in the start menu Run and do as illustrated.
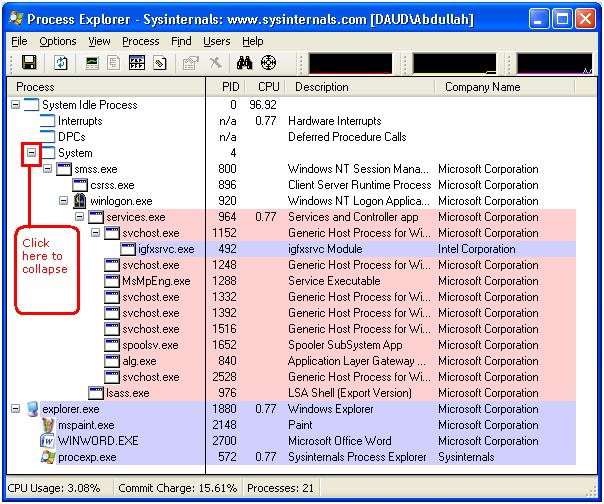
1111.jpg
After collapsing
1212.jpg

procexp.exe is Process Explorer’s own process

winword.exe is MS WORD

mspaint.exe is Paint

IEXPLORE.exe is Internet Explorer

Wmplayer.exe is Windows Media Player

If you do see any suspicious process

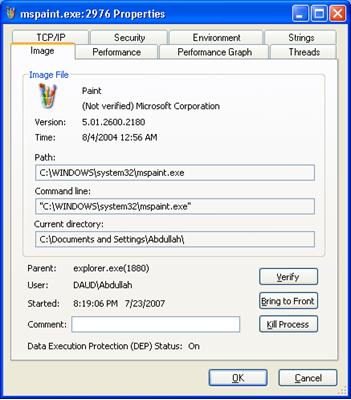
then right click on it and then properties. In the path: field copy the path and Open Run Dialogue and paste the path there
Now terminate the suspicious task in process explorer
If the same process starts again then suspend the process by right clicking on it and click suspend on the menu. Remove the name of the application from path now listing only folder.

e.g If you have copied C:\WINDOWS\system32\mspaint.exe then remove mspaint.exe and you will see C:\WINDOWS\system32\ this in the Run Dialogue.
4444.jpg

Delete Hidden Files

Press Enter to open Explorer and locate the file name whose name you have just removed.After locating the file delete the file.If you can not find the file it must be hidden.

If Show Hidden Files and Folders Option not working Use WinRAR

To remove hidden files Download WinRAR which will show you all hidden files

55555.jpg

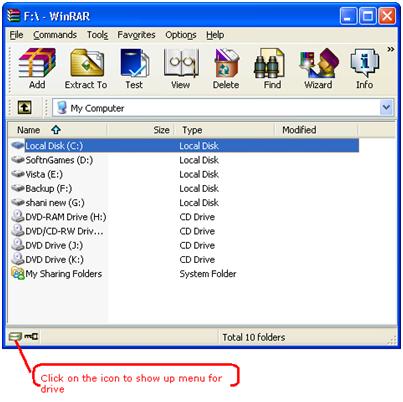
See the figure and locate that file and delete that file. If still unable to delete file then see our post about deleting the file.

Now look at the root of every drive to find hidden files.

Delete .exe and autorun.inf like files if you find any. But do not delete these files as these are system files

autoexec.bat, boot.ini, bootmgr,config.sys, io.sys, msdos.sys, ntdetect.com, pagefile.sys,ntldr, hiberfil.sys

Now you have successfully terminated virus process the next thing is to remove those virus files which start upon system start.

Open Autoruns by typing autoruns in the Run Dialogue. Wait while refreshing completes.

In the Options –> Hide Microsoft Entries. And click Refresh button on the interface OR Close the program and start again

autoruns.jpg

After scanning completes select Logon tab and uncheck all the entries be sure do not unselect any Microsoft Entry.Restart system for the changes to take effect.

Now use Ravmon Virus Killer to restore some settings

Now scanning your system for an Anti-Virus will be the last suggestion

Troubleshooting

Incase of any problem. you did a wrong move. Open Autoruns, in the Options –> Unselect Hide Microsoft Entries. And click Refresh button on the interface OR and select all entries .Close the program and start your system again.

Enable Run Command if it is missing from Start Menu December 8, 2007

Posted by raghupathy in Windows.
add a comment

Some User have complained about the Run Command missing from Start Menu due to some virus effects. Also users when press ( Windows Key + R ) to use Run command an error message appears

This operation has been cancelled due to restrictions in effect on this computer. Please contact your system administrator.

screenshot003.jpg

Run not displaying in Start Menu

So I have finally came up with the solution for it. I have made up two solutions, Manual and Automatic. First try Manual and if it did not work then try Automatic.

Manual Solution

Open My Computer –> C drive –> Windows –> System32 –> Locate gpedit.msc file and run it. See the figure below

screenshot004.jpg

While you have opened Group Policy see in the left pane and in the User Configuration Expand Administrative Templates and select Start Menu  and Taskbar now in the right pane locate Remove Run Menu from Start Menu and double click it. See the figures

screenshot005.jpg

screenshot008.jpg

Select Disabled in the properties dialogue and press apply then OK

Now close all open Windows you will see the Run has been restored in Start Menu. See the figure now

94455.jpg

Automatic Solution

Download Ravmon Virus Removal Tool and then use Restore Default Windows Settings to Restore.

After this either Restart or kill explorer.exe or run it again

Posted in Windows | 1 Comment »

new folder.exe virus

Posted by sasikumarp on March 14, 2008

http://www.whoismadhur.com/2008/01/26/how-to-remove-virus-from-usb-drives/

http://tec-updates.blogspot.com/2007/10/new-folderexe-virus-removal-tool.html

http://technize.com/2007/07/18/new-folderexe-sohanad-virus-removal-tool/

New Folder.exe Virus Removal Tool

Posted in Windows | 4 Comments »

wvdial configuration in Linux

Posted by sasikumarp on March 13, 2008

[Dialer Defaults]
Modem = /dev/ttyUSB0
Baud = 57600
Init1 = ATZ
Init2 = ATQ0 V1 E1 S0=0 &C1 &D2
Phone = #777
Username =internet
Password =internet
Ask Password = 0
Stupid Mode = 1
Idle Seconds = 500
ISDN = 0
Auto DNS = 1

Posted in Linux | Leave a Comment »

Simple steps to configure CVS

Posted by sasikumarp on March 13, 2008

Linux setup a Concurrent Versioning System (CVS) howto

Q. I am planning to use Concurrent Versioning System. I am using both Red Hat and Fedora Linux. How do I setup a CVS server?

A. Concurrent Versioning System (CVS) a widely used version control system for software development or data archiving solutions.

From the wiki page, “CVS keeps track of all work and all changes in a set of files, typically the implementation of a software project, and allows several (potentially widely separated) developers to collaborate”.

CVS Configuration – Install CVS

Use rpm or up2date or yum command to install cvs:# rpm -ivh cvs*OR# up2date cvsOR# yum install cvsCreate a CVS user# useradd cvs
# passwd cvs
Above command will create a user cvs and group cvs with /home/cvs home directory.

Configure CVS

Open /etc/profile and append following line:# vi /etc/profileAppend following line:export CVSROOT=/home/cvsSave the file and exit to shell promot.

Make sure your /etc/xinetd.d/cvs looks as follows:# less /etc/xinetd.d/cvsOutput:

service cvspserver
{
       disable            = no
       socket_type    = stream
       wait                = no
       user                = cvs
       group              = cvs
       log_type          = FILE /var/log/cvspserver
       protocol          = tcp
       env                 = '$HOME=/home/cvsroot'
       bind                = 192.168.1.100
       log_on_failure  += USERID
       port                = 2401
       server             = /usr/bin/cvs
       server_args     = -f --allow-root=/home/cvsroot pserver
}

Note: Replace 192.168.1.100 with your actual server IP address.

Restart xinetd:# service xinetd restartAdd users to this group (see this howto for more info)# adduser username -g cvs
# passwd username

Client configuration
Finally user can connect to this CVS server using following syntax:
$ export CVSROOT=:pserver:vivek@192.168.1.100:/home/cvs
$ cvs loginWhere,

  • vivek – username
  • 192.168.1.100 – CVS server IP

See also:

Posted in Linux, Uncategorized | Leave a Comment »

NDISwrapper Setup Information (SUSE Linux 10.1, 10.2, 10.3, and SLED/SLES)

Posted by sasikumarp on March 6, 2008

Pre-Flight Checklist

In order to use this guide, you will need to prepare the following:

  1. An installed copy of SuSE Linux, 10.1 or greater, or a copy of SUSE Linux Enterprise Desktop/Server 10. This guide will not work for SUSE Linux 10.0 – please see the 32-bit guide or the 64-bit guide for SUSE Linux 10.0.
  2. A wireless network card.
  3. An existing internet connection of some kind.
  4. Your OWN bag of Skittles®, since this bag is mine
Installing via Repositories
f the SUSE 10.x box is connected to the internet already, and you’re just trying to get WIFI working, this is the section for you. Once you have completed this section, you will be ready to install the Windows XP drivers and get your internet working. Let’s begin.

  1. Start YaST.
  2. Left-click once on the “Installation Sources” or “Software Repositories” button. After a minute, a list of repositories will appear.
  3. Left-click once on the “Add” button at the bottom left of the screen.
  4. Left-click once on the “Specify URL…” button at the bottom of the list.
  5. Left-click once on the “Next” button at the bottom right corner of the screen.
  6. Insert one of the following URLs into the box, depending on what distribution you run.

    NOTE: Any and all packages for OpenSUSE 10.3 are now handled by Andrea F., who is part of the Packman repository. Please update your links.

    SLES\SLED 10: http://download.opensuse.org/repositories/home:/andrewd18/SLE_10/
    SUSE Linux 10.1: http://download.opensuse.org/repositories/home:/andrewd18/SUSE_Linux_10.1/
    OpenSUSE 10.2: http://download.opensuse.org/repositories/home:/andrewd18/openSUSE_10.2/
    OpenSUSE 10.3 (USA Mirror): http://packman.unixheads.com/suse/10.3/
    OpenSUSE 10.3 (Germany Mirror): http://packman.iu-bremen.de/suse/10.3/

  7. Left-click once on the “Next” button at the bottom right corner of the screen. You will be returned to the list of repositories.
  8. Left-click once on the “Finish” button at the bottom right corner of the screen. You will be returned to the main YaST screen.
  9. Left-click once on the “Install/Remove Software” or “Software Management” button. After a minute or three, software installation page will appear.
  10. Type kernel into the search box and left-click once on the “Search” button.
  11. Find the kernel package that is installed (it will have a checkmark or a lock next to it). Write down the name of the kernel, for example, “kernel-default” or “kernel-bigsmp”.
  12. Type “ndis” into the search box and left-click once on the “Search” button.
  13. Right-click once on the ndiswrapper package. A menu will appear.
  14. Left-click once on either “Install” or “Update”.
  15. Right-click once on the ndiswrapper-kmp* package that corresponds with the kernel you wrote down above. For example, if you had the kernel-default package, you would right-click on the ndiswrapper-kmp-default package.
  16. Left-click once on either “Install” or “Update”.
  17. Right-click once on the ndisgtk package. A menu will appear.
  18. Left-click once on either “Install” or “Update”.
  19. Left-click once on the “Accept” button in the bottom right corner of the screen. The software will be installed.
  20. Exit YaST.
Readying the Drivers
Now that all the software we need is installed, we need to bring the drivers our hardware needs to the SUSE machine.

  1. Visit the ndiswrapper Ndiswrapper WIKI: Card Listing to see if a certain Windows XP driver is known to work for your WIFI card.
  2. Download either the Windows XP driver listed on the WIKI, or the latest Windows XP driver off your manufacturer’s website.
  3. Place the drivers on the Desktop of your SUSE Linux machine, unzipping them if necessary.
Continue to the Installing Drivers with NDISGTK section.
Installing Drivers with NDISGTK
Now that all the software we need is installed, we can give ndiswrapper the Windows XP drivers.

  1. Start NDISGTK. It should be located in your menu at Applications -> System -> More Programs -> NDISGTK
  2. Click “Install New Driver”.
  3. Point NDISGTK to the .inf file for your WIFI card.
  4. Click the “Install” button.
  5. Verify that NDISGTK shows your driver is installed and that the hardware is present.
  6. Click “Configure Network” and continue to the YaST Configuration section.
YaST Configuration
Now you have arrived at the best part, the part where you actually get the wireless card to connect to your router so you can surf the internet! I highly suggest that you configure your WIFI card with YaST.

  1. In NDISGTK, left-click once on the “Configure Network” button. YaST’s network module will appear. (This screen can also be accessed through YaST -> Network Devices -> Network Card)
  2. Choose either “Traditional Method with IFUP” or “User Controlled with NetworkManager”. Most users will want NetworkManager. SUSE 10.1 users should be advised that NetworkManager is broken on their distribution.
  3. If your card is listed, continue with step 3. If your card is not listed, skip to step 9.

  4. Left-click once on your card’s listing.
  5. Left-click once on the “Edit” button.
  6. Left-click once on the “Advanced” button.
  7. Left-click once on the “Hardware Details” menu item.
  8. Change the Module Name field from whatever it currently is to ndiswrapper.
  9. Skip to step 13.
  10. Left-click once on the “Add” button.
  11. Left-click once on the “Device Type” pull-down menu and then left-click once on “Wireless”.
  12. Enter ndiswrapper into the Module Name field.
  13. Left-click once on the PCMCIA or USB button if appropriate.
  14. Left-click once on the “OK” button.
  15. Left-click once on the “Next” button.
  16. Left-click once on the “Operating Mode” pull-down menu and then left-click on either Ad-Hoc, Managed, or Master. Most users will want Managed mode.
  17. Enter your router’s ESSID into the “ESSID” field.
  18. Left-click once on the “Authentication Mode” pull-down menu and choose either Open, Shared Key, WPA-EAP, or WPA-PSK.
  19. Enter your encryption key in the “Encryption Key” field if appropriate.
  20. WPA Users: Left-click once on the “Next” button.
  21. WPA Users: Enter your encryption/login settings as appropriate.
  22. Left-click once on the “Next” button.
  23. Left-click once on the “Finish” button.
  24. Exit YaST.
  25. Exit NDISGTK
If everything worked properly, you should be connected to your network and the internet. Congratulations.
The Original link is here:

Posted in Linux, Uncategorized | Leave a Comment »

How to access Windows Fat32 partition in Suse 10.3?

Posted by sasikumarp on March 6, 2008

ntroduction: Continuing Windows users who install Linux like to maintain a Fat32 partition for data storage and swapping between Windows and Linux. Often they get “Permission denied” or similar messages when they try to write to the Fat partitions. This Tutorial shows how you set the user and group IDs in the file system table located at /etc/fstab to allow broad writeable access. The easy way is just to edit the fstab entries entries but if you’re from Windows Land you will be slaves to the GUI for a while. I do include fstab entries for advanced users who might browse here for reference.ERRORScene Setting: The screenshot to left, Pic 1, shows my filesystem viewed in Yast’s Expert Partitioner, located at Yast –> System –> Partitioner. Yours will of course be different.

There are eleven partitions in this example on my primary drive, sda, and the Fat32 partition is highlighted in blue, partition sda3. We’re only concerned here with the Fat32 partition.

Mount Point: The files on the Fat32 partition will appear in a directory/folder of your choice once sda3 is mounted. For illustration I choose “fat32″ in the directory /mnt; this directory is conventionally used in Suse for locating mounts although there’s no compulsion to use it. So for illustration the mount point is /mnt/fat32.

Mounting using Yast: In Yast –> System –> Partitioner you highlight the Fat32 partition in Pic 1 and click “Edit”. The screen in Pic 2 opens up and there you insert into the panel for “Mount Point” the path to the directory of your choice; e.g. /mnt/fat32.

ERROR ERRORThen Click “Fstab Options” in Pic 2 to set ownership and other details. The screen in Pic 3 will open up. Activate the selection “Device Name”. If the line users,gid=users,umask=0002,utf8 is not in the slot for “Arbitrary option values” then type it in. This line gives ownership to root and read/write access to all users. These permissions are meaningless in Windows and do not carry across when viewed there. In Windows all files belong to all users.

From this point you click the appropriate “OK”, “Next” and “Apply” buttons to make it happen.

Permissions on the mount point: The mount point, /mnt/fat32, needs to have ownership=root and group=users. In openSUSE 10.3 that happens automagically but it doesn’t happen that way in openSUSE 10.2 or Suse 10.0, 10.1. You must make the necessary changes to the mount point (folder/directory) when the partition is NOT mounted.

Here are the extra steps needed in Suse 10.0, 10.1 and openSUSE 10.3.

  • Open a terminal and assume root privileges with command: su
  • Unmount the partition with command: umount /dev/sda3
  • Change ownership with command: chown -R root:users /mnt/fat32
  • Change permissions with command: chmod 775 /mnt/fat32

ERRORJust for completeness, you could do the last three steps in a GUI using Konqueror or Nautilus. First unmount the partition. Then Navigate to the folder /mnt/fat32 and change the ownership and permissions as shown for Konqueror on the left in Pic 4.

Here is the entry in fstab for the mount:

/dev/sda3 /mnt/fat32 vfat users,gid=users,umask=0002,utf8=true 0 0

Bug in Yast Partitioner in openSUSE 10.3: Sometimes in 10.3 the line in fstab for the mount lists the device by device ID rather than by device path as emphasised in red in Pic 3. Why? It is because even though you choose “Device name” in Pic 3, you get “Device ID” transferring through to fstab. That’s a bug in Yast Partitioner but only in 10.3. You can fix that by editing the entry in fstab and changing it to look like the line directly above. You can edit fstab directly with this command in a terminal:

For KDE use kdesu kwrite /etc/fstab

For Gnome use gnomesu gedit /etc/fstab

I will remove this bug work-around when and if it’s fixed. Please let me know if you discover it’s fixed before I do.

But I want Privacy From Others: In this case you make the mount point in the territory of the chosen user, say at /home/michael/fat32. It’s a standard folder with no special permissions, owned by “michael” with default permissions drwxr-xr-x. Do that first. You can mount the partition in Yast using the new mount point (/home/michael/fat32) instead of the one shown in Pic 2 and these “Arbitrary options” instead of the ones shown in Pic 3: uid=michael,gid=users,utf8=true.

Now the Fat32 partition will be writeable by Michael and readable by all users. If you want absolute privacy you can make a directory within fat32 that is “forbidden” to all users but Michael. Note that you cannot make the directory fat32 forbidden to other users, only directories under directory fat32. Here is the entry in fstab for the fat32 partition under these more restricted circumstances:

/dev/sda3 /home/michael/fat32 vfat uid=michael,gid=users,utf8=true 0 0

That’s all folks. Hope it helps.

Why can’t we create a folder by name CON? February 21, 2008

Posted by raghupathy in Windows.
add a comment

I’ve been asked this question many a times: Why can’t we create a folder by name CON? Although it seems a wonder or magic that we can’t create a folder by that name, in reality, it is not so. It has a definite reason, and in fact, a folder can be created using that reserved name.Gone are the days when computers had only CUI OS, that is, Character User Interface Operating Systems, like MS-DOS. When I joined my first computer course nine years ago, Windows 95 was ruling. You could see Windows 98 here and there. We were in 8th standard, and working on a computer was like a dream coming true. Microsoft’s Paint Brush was the only known (for us) GUI software and was the greatest means of entertainment. The instructors taught us only MS-DOS commands and how to Shut Down the computer. Remembering such weird names as DIR, CD, MD, RD, CHKDSK, FDISK, VER, ATTRIB, REN, DEL etc. along with their syntax and usage was a great accomplishment. But I had a problem understanding this: DOS has a separate dedicated command for every action; literally every action, except… creating a file!

Yes, we used COPY CON filename to create a file with name filename. Anyone can say that it is a form of COPY command. So, why was creating a file different than all other commands? I didn’t understand it, till I found out how to print using DOS, almost four years later.

DOS uses different names for the attached devices, I learnt. PRN was one such name. TYPE filename would display the contents of a file and TYPE filename > PRN would print it instead of displaying. Curiosity brings many hidden matters out. PRN would surely mean Printer and will redirect the output to the printer instead of console. Console (monitor) is the implicit default output device, and it can be bypassed if needed. So, how to put it explicitly? There must be some means to do that. Yes, there is! TYPE filename > CON performs exactly same function as TYPE filename. These special names for the devices really mean something special for the operating system and those names can not be used as folder or file names: CON, PRN, NUL, COM1 to COM9, LPT1 to LPT9, which stand for CONsole, PRiNter, NULl, serial COMmmunication ports, Line PrinTer ports.

The time has changed and Operating System can also be fooled! But still, many people think that it is not possible to create a folder by name CON. Using the path of network drive, these special names can also be used as folder names! Here is how:

  1. Goto DOS
  2. Type MD \\.\C:\CON. The folder will be created. You can check it in Windows Explorer also, but you can’t access it
  3. To delete the folder, type RD \\.\C:\CON

In short, use the network path syntax instead of absolute path syntax.

Now on to the practical aspect of this. Why can’t we create it directly but using the network path syntax? The answer is simple. A computer can have only one default console, printer, null etc. So, if it is accessed from a network, theoretically, the console should belong to another node in the network. Since that node may not have a device which can be referred using the name CON, it will no longer be considered as a reserved name. Hence, the folder can be created.

The next time when someone asks the question why we can’t create a folder by name CON, say with confidence that it is not true…

Posted in Linux, Uncategorized | Leave a Comment »